Using Elastic Load Balancers (ELB) to Scale Your Servers on AWS for Seamless Traffic Distribution


Introduction.
It is crucial to give your servers high availability, scalability, and fault tolerance in the modern digital environment. The hidden weapon in your armory for intelligently dispersing traffic across several AWS servers is Elastic Load Balancers (ELB).
Welcome to this article, where we set out to perfect the art of employing ELB for traffic distribution. This article helps to navigate the complexities of setting up your load balancer and then reveals the potential of this potent AWS tool. Say goodbye to single points of failure and welcome to a reliable infrastructure that adapts to traffic demands with ease.
Services required
EC2: to create 2 EC2 instances
Amazon AMI: to create a machine image, using this image to create another EC2 instance
IAM roles: to create a role with permission to have full access to S3 and use aws session manager
S3: to create a bucket to store my code
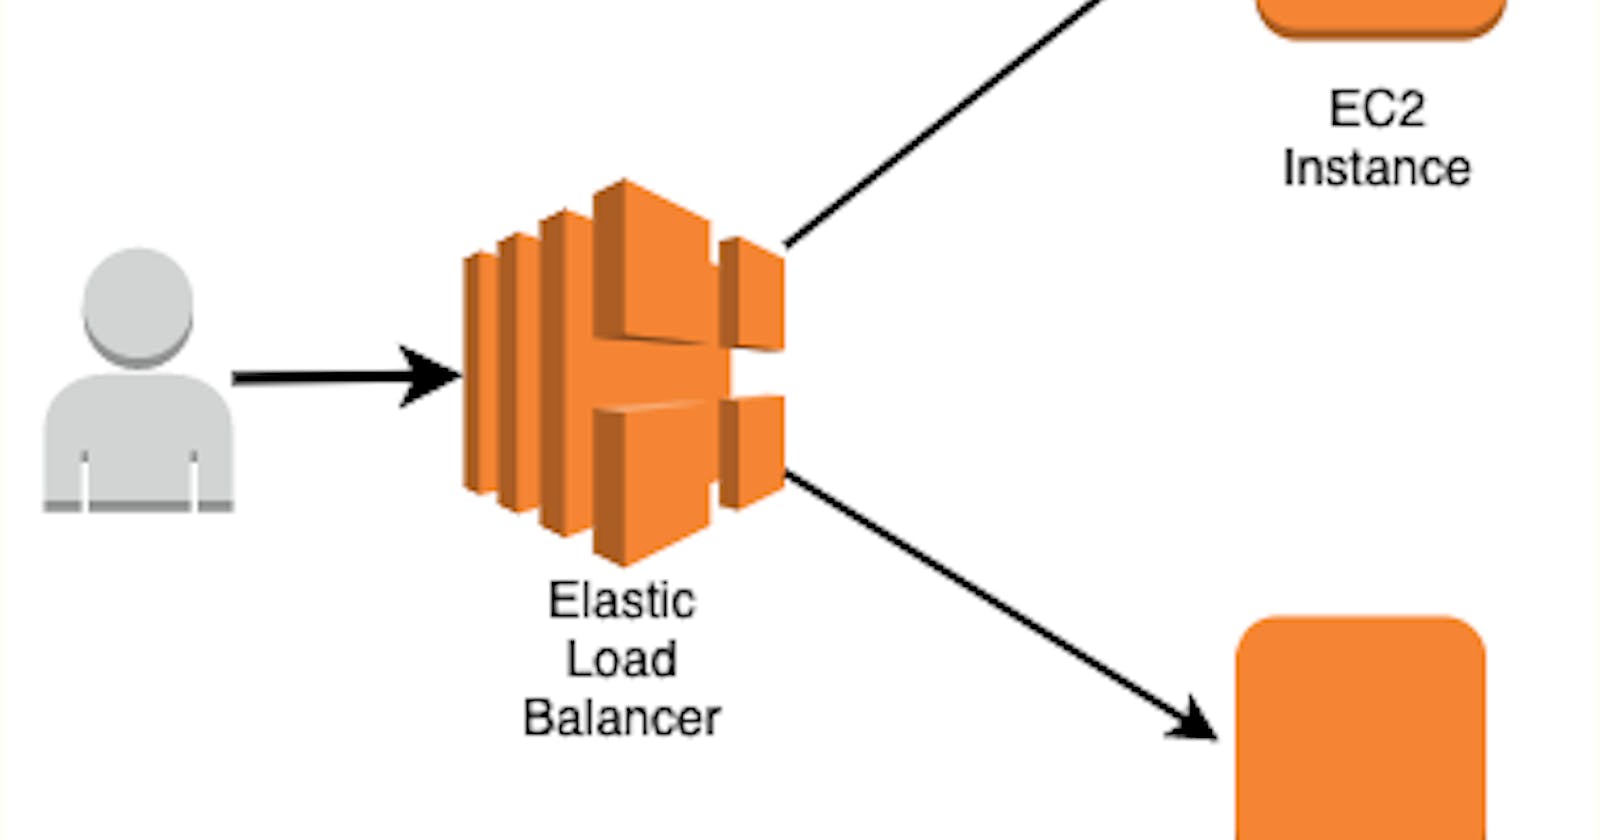
ELB: to evenly distribute traffic to 2 servers
Steps.
1. Login to your AWS account, and navigate to IAM dashboard to create a role.


2. Let the entity type be AWS service, as we want 2 services to interact.


3. Add 2 permissions, s3 full access and SSM managed instance core (to enable the use of aws session manager).

4. My role (newwebserverrole) has been created

5. Navigate to S3 and create a bucket, giving it a unique name.

6. Bucket has been created.

7. Upload source code to the newly created bucket.


8. Navigate to EC2 to launch an instance with the necessary configurations.


9. Add the created role in the IAM instance profile.

10. Add user data; user data perform common automated configuration tasks and runs scripts after the instance starts.

11. Launch the instance.

12. Instance is up and running (based on instance state and status checks), copy public IPV4 DNS and paste it on browser to view the site.

13. Site is visible.


14. Create an Amazon machine image (AMI) of the first EC2 instance.
An AMI makes it easy to launch another instance by copying the property/image/configuration of the EC2 instance, instead of starting from scratch to launch another instance.

15. Creating an AMI from a previously created instance.


16. Instance from AMI is created.

17. The status of AMI is pending (might take a while to change to available).

18. AMI is available and ready to use.

19. Create a second server using AMI, To ensure high availability, I will host my site on 2 servers (in different AZs, just in case there is a failure in one AZ, which rarely happens).


20. I have launched 2 instances running on 2 different AZs (this is a best practice for high availability).

21. Site is visible on the second EC2 instance (copy public IPV4 DNS and paste it on browser).

22. Create a load balancer (load balancer can be found on EC2 dashboard); an elastic load balancer is used to equally distribute traffic across instances (uses the concept of a round robin).


23. Before creating ELB, a security group has to be created.


Summary for ELB configuration.

24. Creating a Security group for ELB.


25. In the health check path, the '/' means it will test the home page (by default), to specify other pages including the path.

26. Register target(s) to indicate server(s) that ELB will route traffic to (in this case, it will be routed to the 2 EC2 servers).

27. ELB has been created.

28. ELB is currently active.

29. Copy the DNS name for ELB and paste it on the browser to view the site, a best practice is to use ELB's DNS name to view the site instead of the public IPV4 DNS of EC2 because traffic goes to the ELB which evenly distributes to the EC2 instance (the 2 servers are behind the ELB).

30. To show how the load balancer works by indicating the exact server routed to at a particular time, Navigate to Systems Manager => Session Manager, to start a session on my 2 servers, where I can use basic HTML and Bootstrap to indicate the server traffic is routed to at each refresh.

31. Navigate to index.html and open a nano text editor.

32. Editing code with HTML.

33. Each refresh shows the server traffic is routed to (either web server 1 or web server 2).


34. I noticed that at step 23, using the ELB name was not working because I selected 2 security groups, so I had to undo and choose the right SG.

Conclusion.
This conclusion shows how to attach an elastic load balancer to servers and distribute traffic evenly to these servers.
Thank you for reading and feel free to connect with me on Twitter and LinkedIn.